Hate styling forms? That’s because they’re ugly. Luckily CSS makes it easy to change the colour, borders, and text which will make them look way better – but sometimes you want something with a little more wow!
A month ago I came across this article on Codrops (they have some really awesome effects) and became a little obsessed with fancy text input effects. When I originally looked at them I’ll admit I spent a few hours trying to figure out how they did them and pouring over my dev tools before I finally decided to give up for the time being. Fast forward three weeks and I was styling the form on my personal site and it was back to the Codrops article for a little inspiration. What I couldn’t figure out three weeks ago, now seemed so much easier and with just a little JavaScript my form did something cool!
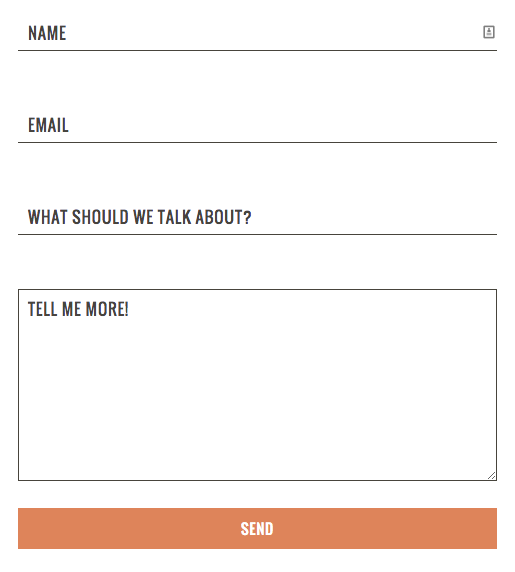
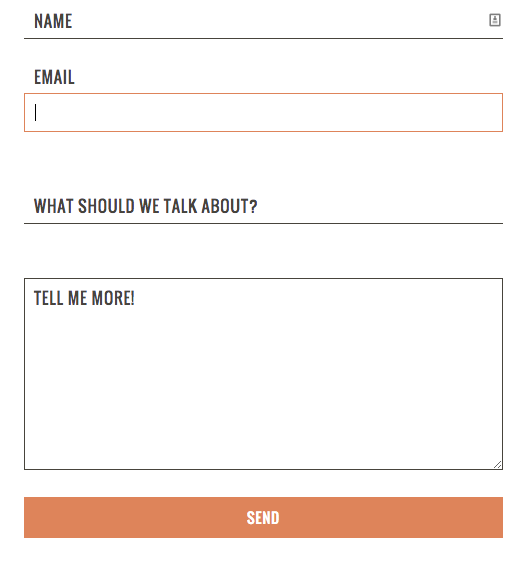
What you can’t see from the images is that when the input field is clicked, the label slides upwards.
Here’s how I did it:
First you need to create your form and give your input fields corresponding labels wrapped in a span. These spans will need to have different classes so you can select them separately. I also added class of “labelStart” so I can set their starting position. Then, add a different class to each of your input fields (mine are named focused with a number from 1-4) so that you can target each input separately with jQuery.
<div class="innerWrapper">
  <form action="">
    <div class="slideSpan">
      <span class="label1 labelStart">Name</span>
      <input type="text" class="focused1"/>
    </div>
    <div class="slideSpan">
      <span class="label2 labelStart">Email</span>
      <input type="email" class="focused2" />
    </div>
    <div class="slideSpan">
      <span class="label3 labelStart">Subject</span>
      <input type="text" class="focused3"/>
    </div>
    <div class="slideSpan">
      <span class="label4 labelStart">Message</span>
      <textarea name="your-message" id="" cols="30" rows="10" class="focused4"></textarea>
    </div>
    <input type="submit" />
  </form>
</div>
I then apply all the styles that I want on each input (border, font family, etc.). Next, I style the class of labelStart using absolute positioning. The parent element is set to position relative. Then I create a labelSlide class that serves as the end position.
@mixin label {
  display: inline-block;
  width: 146px;
  transition: all 0.5s;
  left: 10px;
  font-family: $headerFont;
  text-transform: uppercase;
}

div.slideSpan {
  position: relative;
}

form span.label1 {
  @include label;
}

span.label2 {
  @include label;
}

span.label3 {
  @include label;
  width: 225px;
}

span.label4 {
  @include label;
  width: 152px;
}

form span.labelStart {
  top:30px;
  position: absolute;
}

span.labelSlide {
  top: -6px;
  position: absolute;
}
All that’s left is to add in the jQuery and you’re good to go.
I wrote a function for each time the input fields are clicked which adds the class of labelSlide and removes the class of labelStart from the span.
$('input.focused1').on('click', function(){
  $('span.label1').removeClass('labelStart');
  $('span.label1').addClass('labelSlide');
});

$('input.focused2').on('click', function(){
  $('span.label2').removeClass('labelStart');
  $('span.label2').addClass('labelSlide');
});

$('input.focused3').on('click', function(){
  $('span.label3').removeClass('labelStart');
  $('span.label3').addClass('labelSlide');
});

$('textarea.focused4').on('click', function(){
  $('span.label4').removeClass('labelStart');
  $('span.label4').addClass('labelSlide');
});
And you’re done! Now when you click on your input to enter text, your label will slide upwards! Try it out on your own site, or if you want to see it in action you can check out the codepen here.